Phone:
(701)814-6992
Physical address:
6296 Donnelly Plaza
Ratkeville, Bahamas.
Phone:
(701)814-6992
Physical address:
6296 Donnelly Plaza
Ratkeville, Bahamas.
Painting old kitchen cabinets remains one of the highest-return DIY projects a homeowner can tackle, often at a fraction of the cost of replacement. But success depends entirely on proper prep and the right materials. Skip a cleaning step or use the wrong primer, and the paint will peel within months. This guide walks through every critical phase of a professional-grade cabinet paint job, from degreasing to final coat, so the finished result looks factory-fresh and lasts for years.
Cabinet replacement typically costs $8,000 to $25,000 or more, depending on kitchen size and material quality. A professional paint job runs $3,000 to $6,000, while a capable DIYer can achieve comparable results for $200 to $500 in materials, primer, paint, hardware, and supplies included.
Beyond cost savings, painting preserves structurally sound boxes and frames. Many older cabinets feature solid wood face frames and plywood boxes that outlast modern particleboard alternatives. If the doors close properly, hinges hold firm, and boxes aren’t water-damaged, there’s no structural reason to replace them.
The project does demand time and patience. Plan for a full weekend (or two) if working solo, plus drying time between coats. Kitchens will be partially out of commission during the process, so coordinate meals accordingly.
Materials needed:
Tools:
Set up a dedicated workspace for doors and drawers, a garage, basement, or spare room works well. Lay sawhorses with padded 2x4s across them to create drying racks that allow access to both sides of doors without smudging wet paint. Label every door and drawer with painter’s tape on the back, noting its original location (e.g., “upper left, top”).
Cover countertops and floors near base cabinets with rosin paper or canvas drop cloths. Plastic sheeting gets slippery and doesn’t absorb drips.
Grease and cooking residue are the top reasons cabinet paint fails. Even cabinets that look clean harbor invisible oils that prevent adhesion.
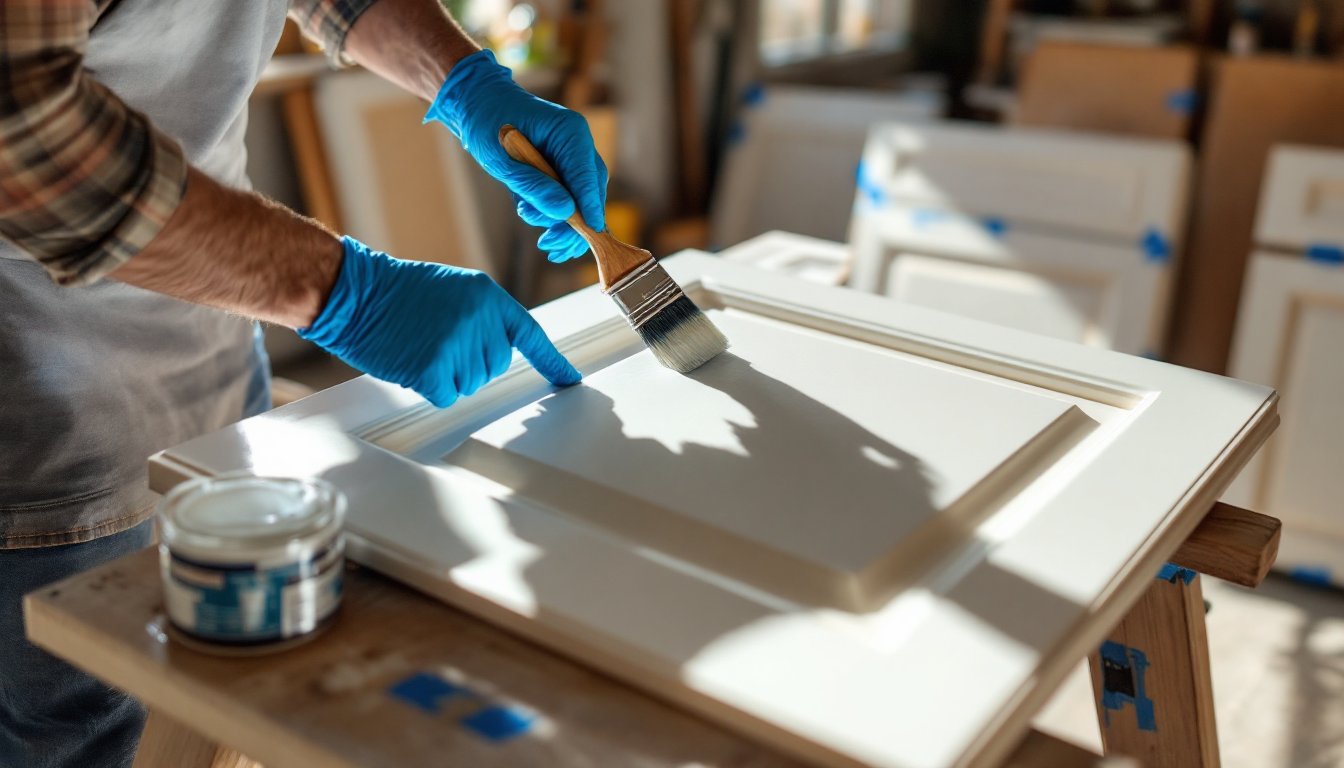
Step 1: Remove all hardware and doors
Unscrew hinges, handles, and drawer pulls. Store hardware in labeled bags if reusing. Take doors and drawer fronts to the workspace. Leave cabinet boxes in place.
Step 2: Deep-clean every surface
Mix a TSP substitute according to package directions (standard TSP works but requires more rinsing and PPE). Scrub all surfaces with a sponge, paying extra attention to areas near the stove. Wipe down with clean water and let dry completely, 4 to 6 hours minimum, longer in humid conditions.
Step 3: Sand and fill
Sand all surfaces with 220-grit sandpaper to break the existing finish and create tooth for primer. The goal isn’t to strip old paint, just to scuff it. Use a sanding block on flat areas and hand-sand profiles and edges.
Fill gouges, dents, and old hardware holes with wood filler. Let dry per manufacturer’s instructions (typically 30 minutes to 2 hours), then sand flush with surrounding surface.
Step 4: Vacuum and tack
Vacuum all dust from surfaces and surrounding areas. Wipe everything with a tack cloth or slightly damp microfiber towel. Any remaining dust will show as bumps in the final finish.
Not all paints hold up to the constant wear, moisture, and grease exposure that kitchen cabinets endure.
Primer selection:
Use a bonding primer designed for slick surfaces. Shellac-based primers (like BIN) block stains and tannins effectively, especially on oak or cherry. 100% acrylic bonding primers work well on previously painted surfaces and offer lower odor. Oil-based primers provide excellent adhesion but require mineral spirits for cleanup and longer dry times.
Paint type:
Alkyd enamel (oil-based) delivers the hardest, most durable finish and self-levels to minimize brush marks. Expect 16 to 24-hour dry times between coats and strong odor, ventilation is mandatory. Cleanup requires mineral spirits.
Acrylic-alkyd hybrid paints combine alkyd durability with water cleanup and lower VOCs. Brands market these specifically as cabinet and trim paints. Dry times run 6 to 12 hours between coats.
100% acrylic latex cabinet paints have improved significantly but still don’t match alkyd hardness. They work for low-traffic spaces but may show wear faster near sinks and dishwashers.
Sheen options:
Satin (25–35% gloss) hides minor imperfections and wipes clean easily, the best all-around choice.
Semi-gloss (35–70% gloss) is highly washable but highlights every surface flaw. Reserve for perfectly smooth cabinet boxes.
Matte or eggshell finishes aren’t durable enough for kitchens.
One gallon of paint typically covers 350 to 400 square feet per coat. Most kitchens require 2 to 3 quarts of primer and 1 to 2 quarts of topcoat, depending on size and number of coats.
Priming (Coat 1):
First topcoat (Coat 2):
Second topcoat (Coat 3):
Optional: Spray application
An HVLP sprayer produces the smoothest finish but requires careful masking, thinning paint to the right viscosity, and practice to avoid runs. Spraying also demands a well-ventilated, dust-free space and respirator use. For first-timers, brush-and-roller methods are more forgiving.
Paint may feel dry to the touch within hours, but full cure takes 7 to 30 days depending on paint chemistry. During this period, the finish hardens and reaches maximum durability.
Drying guidelines:
Reassembly:
Reattach hinges using the original holes. If switching hardware, fill old holes with wood filler, let cure, and drill new pilot holes for the replacement pulls or knobs. Consider upgraded soft-close hinges, they reduce wear on painted surfaces by preventing slamming.
Reinstall doors following the labels applied during disassembly. Check alignment and adjust hinge screws as needed.
Long-term care:
Properly prepped and painted cabinets regularly last 10+ years before needing a refresh.
Painting old kitchen cabinets delivers dramatic results for modest investment, but only when every prep step is honored. Thorough cleaning, quality primer, the right paint, and patience during drying make the difference between a finish that lasts a decade and one that peels in six months. For homeowners willing to invest the time, it’s a project that pays back in both function and aesthetics.